St Mary’s Church, Lead, is a redundant Anglican chapel standing in an isolated position in fields some 0.75 miles (1.2 km) to the west of the village of Saxton, North Yorkshire, England. Though technically a chapel, it is generally referred to as a church. It is managed by the Churches Conservation Trust, and is recorded in the National Heritage List for England as a designated Grade II* listed building. The chapel stands close to the site of the battle of Towton of 1461, which was part of the Wars of the Roses. In the 1930s it was saved from neglect by a local group of ramblers, and is known locally as the Ramblers’ Church
Source: Wikipedia

The picture that you see above was the culmination of a long nights shooting in the middle of a very cold field! By the time I left I had ice on my tripod and camera… I thought I must be crazy… but when I saw the end result, I decided that it was worth it.
What I was looking for in this shot, was the Milky Way rising behind the church, subtly illuminated windows and maybe a little bit of light on the outside of the church. This particular night had no moon in the sky, and the Milky Way was almost vertical at time that I had planned, all of which I planned in advance using a great app called PhotoPills. This is an app I use all the time to plan my shoots in advance, especially if I am wanting the sun, moon or Milky Way in a certain position. There are lots of other tools in the app, such as a Long Exposure Calculator, field of view augmented reality, and other useful things. I may do another blog on the usefulness of the app (afraid only available on iOS at the moment), but in the meantime if you want more info, pop on over to their website www.photopills.com.
Here is the plan as I saw it in PhotoPills:
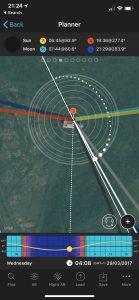
I positioned myself approximately where the black pin is, and you can see the Milky Way position is shown by the dotted curve (meaning it would be almost vertical in the sky). From the top of the image you can see that the expected viability of the Milky Way (represented by the blue stacking bar at the top left) was almost perfect. Also depicted are the sunrise/set directions, as are the moonrise/set (orange, yellow, light/dark blue lines). Position of the sun/moon below the horizon is depicted by the curved yellow line at the bottom. From this I determined that this would be a good time to venture out, and the sky was forecast as clear.
The only downfall of PhotoPills is the fact that it doesn’t tell you what the light pollution is like in the area, this is something that you have to go to a different site for, www.lightpollutionmap.info is a great resource for checking light pollution in an area. This is the map for St Mary’s Church Lead:
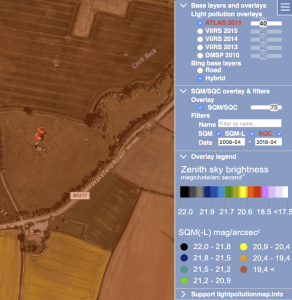
From this site it looks like the pollution is a medium level… not ideal, but not awful… as long as the sky stayed clear and there was no fog/mist in the air, as this reflects any light pollution and makes it look worse.
So I arrived before sunset with a view to taking a blue hour shot of the church to blend with a later night sky shot with the Milky Way in PhotoShop. I setup my Sony A99, attached the Zeiss 16-35mm f2.8 lens, and sorted out my focussing and camera settings, taking care to fix as much as possible. The more that you can make manual when shooting in the dark the better, as it means that the camera isn’t guessing things like white balance, exposure, focus, etc. Using the 500 rule and my lens set to 24mm an exposure time of 20 seconds would comfortably get me pin point stars without trails. For those of you that are not familiar with the 500 rule, this means to divide 500 by the focal length your lens is set to (in my case 24mm) and this gives the maximum exposure length to get pin point stars without trails. Using your exposure triangle (ISO/Shutter/Aperture) you can then determine how is best to get this maximum exposure time. Set your aperture as wide as possible (f2.8 in my case), then play with the ISO setting to get the correct exposure at 20 seconds. This normally leads to a setting of 20 second exposure, f2.8 and ISO between 3200 and 6400.
Taking the blue hour shot of the church I could get a lower ISO image, so less noise, better colours and sharper image. After a while, the sun went down, the stars came out and I continued shooting, placing a torch in one of the back windows of the church to get the windows to glow. As the night went on, and the stars moved around the sky (ok, ok, technically the earth rotates, the stars stay still!), I could see that the Milky Way was not very well defined, even though the sun had long gone below the horizon. Determined not to waste the session I continued shooting until the time that PhotoPills had calculated the Milky Way would be in position, as sometimes the camera will pick up information in the sky your eyes can’t see. One thing that I could see is the one thing I didn’t want had appeared, and that was a low mist that hung on the horizon, and this made the light pollution from the nearby town very obvious. I knew that this would be difficult to get rid of, and I may need to just work with the glow on the horizon.
During the shooting I tried different methods of lighting the church, doing some very subtle light painting with my phone, painting with the torch, all to cover the eventuality that I may need to blend different shots to get the effect that I was after. All of the time being very careful not to move the camera or change the settings, so that I could use these different frames to blend without the image being moved.
It got to the time that the Milky Way was in it’s optimum position, and I shot for a little bit longer, just in case there was some drift in the apps calculations, and called it a night (a very cold one at that!!).
In post processing (in PhotoShop) I reviewed the blue hour shots, and although they were good, they just wouldn’t look right with the darkness of the sky and the orange glow on the horizon, so I opted to work with a light-painted shot, and dropped the illuminated windows in as another layer and used the ‘lighten’ blend method. Because the images were perfectly aligned the lights came on inside the church and this looked great. I then used a blue-hour shot to create a mask for the sky to drop in a further layer with the Milky Way/stars in. Using the sky mask I processed the Milky Way in Nik Tools to remove noise, give some nice contrast to the sky and to try to bring out the Milky Way dust clouds. Also, using a luminance mask I applied this to the sky to recover the stars that were ‘lost’ during the noise reduction.
With some further blending and processing in Nik Tools, and removal of a LOT of molehills, the picture that you see above was the result. Maybe not the ideal image that I had in mind, but I am planning on revisiting this site again on a more clear night to improve on this shot.
Any comments, or questions? They are always welcome below, please feel free to ask any questions and I will do my best to answer them.
Kevin Pawsey – Pawsey Photography

